Showing posts with label kids. Show all posts

Friday, May 25, 2012

Baby's Room

She's almost 1, but I finally got her room 'done.'

It took me a while to get it right - I kept hanging on to the green paint from when my older daughter was in the nursery. But once I painted it tan, it was much easier to go a certain direction - Purple and brown. =)


The curtains, lamp, and rug are from Target. The chair was brand new at a consignment store (it still had the plastic on it!), and the art work is scrap paper cut to design. One is a tree with a chandelier and the other is a peacock. The frames are from Michael's.


I got all the wooden funiture from Ikea. It's the Leksvik collection - which I don't think they make anymore. (Boo!) But it is 4 years old and is still awesome!

The pitcher vase is from Target, and the box and flowers are from Michael's. The teddy bear on the top left was made from my great-grandmother's fur shawl.


Matching Ikea crib. I am really hoping I did the "My Baby" translation correctly! I ordered the wall decal from Uppercase Living's online catalog, and made the wreath from materials from Michael's. I love that place!!

Saturday, May 12, 2012

Toddler Mayhem

My favorite thing to do is be a mom. I have two beautiful girls that are 3.5 and 10 months. Even better, they love each other. The other day my older daughter said, "Mom, I used to be lonely before sister got here." Sooooo much better to hear than what all the books tell you they will say, which is something along the lines of "Mom, when are you going to take that baby back to the hospital?"

Due to my love for these wonderful beings, it is easy for me to overlook some of the newly budding toddler mayhem coming from my well-mannered daughter. Mostly because she's so dang polite when she does it!

Case in Point:
Last night I was upstairs giving the baby a bath. Generally they bathe together so I can keep an eye on both of them, but sometimes the oldest wants a little independence. I mean really, how can you say no to a 3-year-old that politely asks you to have a turn playing with the bath toys all by herself? So there I was, washing baby hair while trying to keep her in a sitting position, when the toddler comes into the room and says, "Mommy, I cut the string off the rug for you."

Since we have hardwood floors, I have a lot of nice rugs in multiple rooms. Some of them have tassles on either side. Actually, four of them have tassles on either side. Now I am trying to rationalize what she means while keeping an active 10-month-old from either drowning or getting soap in her eyes. My only response was, "Oh? Well you'll have to show me when I am done giving sissy a bath." No yelling, no cussing, but maybe a stink-eye thrown in.

After the baby was done, the toddler got into the tub. She wanted to play for what seemed like a rather long time, and then she delayed a return downstairs with lots of games in her room. Fortunately, what is left of my brain reminded me there were some rugs I needed to inspect. Off we marched down the stairs. This is what I found:

Pretty straight line for
a toddler!
First, we had a talk about what is OK to cut with scissors and what is not. Then we created a new rule in the house about not using scissors unless an adult was in the room to supervise.

Since I was the genius that left a toddler in a room alone with safety scissors, I figured I should get most of the blame. What did I expect? At least it was one of the small rugs and she still had all her hair.

Now it came to cleaning up this well-intentioned mess. I asked my daughter where all the "strings" went. Her reply:
All the tassles neatly
placed in the trash can.

Wednesday, May 9, 2012

How To... Make an Awesome Invite

I thought I would start to share how I make some of my projects. This one is an invitation for my daughters' birthday... Which is going to be an awesome party, but that's another post. For the invitations, I wanted to incorporate some of the party themes including: bright colors, paper lanterns. I also wanted the girls to wear those cute custom birthday shirts on Etsy. But I didn't want to wait for them to be made, or spend the money.

Another problem were the professional pictures.Most good parents get professional pictures taken of their children at least once a year. I am lucky to get them done once every few years, and even then I fail getting them ordered in a timely manner. So here I am, wanting pictures with custom shirts and themes. What is a modern math girl to do?? Solve her own problem, of course.

First, custom shirts. I found some cute white shirts and shorts on sale at Kohl's. Then I went to the fabric store and found two cute (and very bright) coordinating cotton prints, with some buttons, fabric paint, and ribbon for extra decoration. I washed them all and ironed them. Then I used some Iron-On material I've had for about 15 years to glue the fabric to the shirts.


Iron the paper (paper-side up) to the backside of fabric #1 and fabric #2. Make a pretty big area, around 1.5ft x 3ft, or however wide your fabric is.


Then use a plate to trace a circle on the paper on fabric #1.
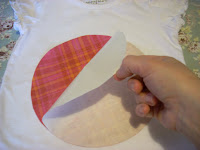


Cut out your circle, peel off the Iron-On paper, and iron onto the shirt sticky-side down. (Make sure to note how your fabric aligns.)


Then repeat the process of tracing a circle on fabric #2 of the Iron-On paper, and draw whatever design you want within that circle. But make sure you draw it mirror-reverse!


Once you cut out your design, iron to the shirt on top of the circle. You can also play around with words or names.


Now it's fabric paint time! Use a small bead of fabric paint around the edges of your iron-on fabric. This will help with fraying as well as outlining your design.


Let dry for a minimum of 4 hours. Wash and dry as usual after 72 hours.


For the shorts, I used the ribbon and buttons to make a cute decoration. The only sewing skills you need are how to sew on a button.


Coordinating ribbon, buttons, and thread.


Make a simple bow, sew it to the shorts with a button.


Now, what about professional pictures?? I created a mini-studio in my dining room with a white coverlet and paper lanterns. I set up a make-shift light diffuser using an adjustable lamb and the matte side of aluminum foil taped to the adjacent wall.

I took a few pictures with a stand-in to get the lighting and flash setting right.


How did they turn out? You be the judge! Total cost: $60 - including 2 outfits and all materials.