Another problem were the professional pictures.Most good parents get professional pictures taken of their children at least once a year. I am lucky to get them done once every few years, and even then I fail getting them ordered in a timely manner. So here I am, wanting pictures with custom shirts and themes. What is a modern math girl to do?? Solve her own problem, of course.
First, custom shirts. I found some cute white shirts and shorts on sale at Kohl's. Then I went to the fabric store and found two cute (and very bright) coordinating cotton prints, with some buttons, fabric paint, and ribbon for extra decoration. I washed them all and ironed them. Then I used some Iron-On material I've had for about 15 years to glue the fabric to the shirts.
Iron the paper (paper-side up) to the backside of fabric #1 and fabric #2. Make a pretty big area, around 1.5ft x 3ft, or however wide your fabric is.
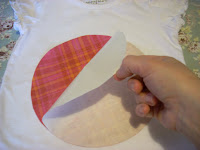
Then use a plate to trace a circle on the paper on fabric #1.

Cut out your circle, peel off the Iron-On paper, and iron onto the shirt sticky-side down. (Make sure to note how your fabric aligns.)
Then repeat the process of tracing a circle on fabric #2 of the Iron-On paper, and draw whatever design you want within that circle. But make sure you draw it mirror-reverse!
Once you cut out your design, iron to the shirt on top of the circle. You can also play around with words or names.
Now it's fabric paint time! Use a small bead of fabric paint around the edges of your iron-on fabric. This will help with fraying as well as outlining your design.
Let dry for a minimum of 4 hours. Wash and dry as usual after 72 hours.
For the shorts, I used the ribbon and buttons to make a cute decoration. The only sewing skills you need are how to sew on a button.
Coordinating ribbon, buttons, and thread.
Make a simple bow, sew it to the shorts with a button.
Now, what about professional pictures?? I created a mini-studio in my dining room with a white coverlet and paper lanterns. I set up a make-shift light diffuser using an adjustable lamb and the matte side of aluminum foil taped to the adjacent wall.
I took a few pictures with a stand-in to get the lighting and flash setting right.
How did they turn out? You be the judge! Total cost: $60 - including 2 outfits and all materials.


No comments:
Post a Comment